Tags are an easy way to group/link entries, even if the entries belong to different journals.
What you'll need
This feature requires Lifecraft Premium.
Create a tag
On your iPhone, iPad
- Tap the entry text to show the onscreen keyboard.
- Tap
above the keyboard to show the keyboard toolbar.
- Tap the Tag button on the right side of the keyboard toolbar (you may need to swipe the toolbar to make the Tag button visible).
- Type the name of the tag. Names of matching tags will automatically appear so you can select a tag without having to type the full name.
- When you’re done typing, the tag will automatically be created and added to your entry.
On your Mac
- Scroll to the bottom of the journal entry until you see the
 button.
 - Click the Tag button and type the name of the tag. Names of matching tags will automatically appear so you can select a tag without having to type the full name.
- When you’re done typing, the tag will automatically be created and added to your entry.
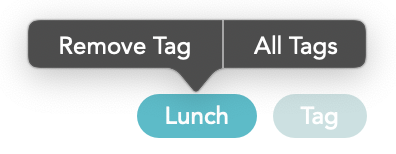
Remove a tag from an entry
Click an existing tag at the bottom of a journal entry. A small window will appear where you can:
- Click Remove Tag to remove the selected tag.
- OR click All Tags to open the Tags view (see below) where you can add/remove multiple tags at once.
Manage tags
Open the Tags view to assign or edit tags:
- Click the More button (···) above the journal entry.
- Select Tags in the More view.
- Click a tag to add or remove it from the entry.
- Click New Tag to create a new tag.
- Click Edit Tags to rename or delete tags.
Filter entries by tag
Switch to the Entry List view, then:
- Click the More button (···) above the entry list.
- Choose Filter by Tag in the More view. The Tags view will open.
- Select one or more tags.
- The entry list will filter to only show entries that have all of the selected tags.
- To stop filtering, click the More button (···) again and choose Stop Filtering.
Comments
0 comments
Article is closed for comments.